
Stunning Things to Do at Niagara Glen Trail: 9 Scenic Stops Worth Seeing

Most people visit Niagara Falls, snap a photo near Horseshoe Falls, then leave. But the real surprise sits below the gorge rim at Niagara Glen Trail, where giant boulders, calm river inlets, fossil walls, and narrow rock passages turn a simple hike into something far more memorable.
If the idea of hiking the gorge feels intimidating, it is easier than it looks. The main loop takes about two hours at a relaxed pace. Beginners do fine here if they wear proper shoes and take their time.
This trail is not a polished city park walk. It is uneven, wild, damp in spots, and full of sharp turns. That is exactly why people remember it.
What Makes Niagara Glen Different from Every Other Niagara Falls Attraction
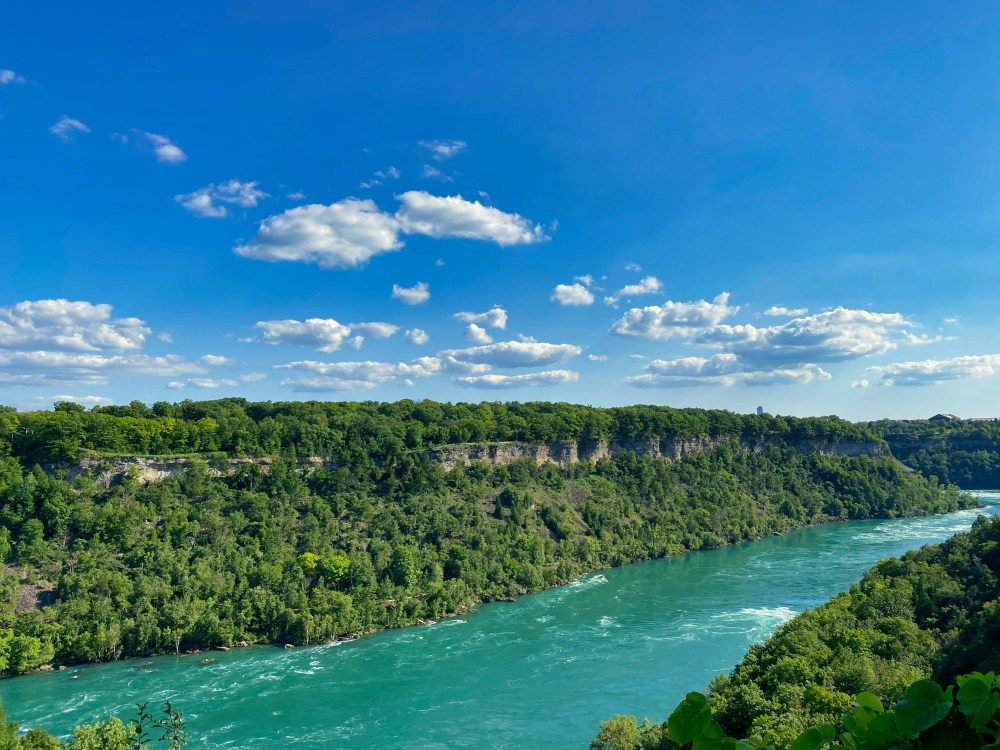
At Niagara Glen, you are walking through the old river channel carved by the falls over 12,000 years ago. Those giant rocks scattered across the trail are not decorative landscape pieces. They broke away from the gorge walls as the falls moved upstream. Some are the size of small houses, and you feel tiny beside them
The river looks different down here, too. From the top lookout, the water seems flat and distant. At the gorge floor, you can see the current fold into swirling eddies beside the rocks. The colour shifts through the day. The early morning often looks deep blue-green, and by late afternoon, it turns silver near the cliff walls.
The forest changes the mood again. Niagara Glen sits inside a rare Carolinian forest zone near the northern edge of its range in Canada. The trail feels cooler, quieter, and older than the tourist strip above.
The Niagara Glen Trail System
The Niagara Glen Trail system is moderate overall. The terrain is uneven, but there is no long uphill climb once you reach the gorge floor.
The staircase descent is the hardest part for most people. After that, the trails split and reconnect through loops that are clearly marked with colour signs. The setup is better than many Ontario hiking areas. Still, first-time visitors often lose track of which loop connects where. Why? Because several trails overlap near the river sections. A quick phone photo of the trail map helps. So, do that first.
The main trails include:
- Main Loop Trail: About 2 km. Best choice for first-time visitors.
- River Trail: Gorge-edge views and river access points.
- Cliffside Trail: Narrow passages and geological landmarks.
- Trillium Trail: Forest-heavy route with fewer crowds.
- Bouldering Trail: Separate access for climbers with permits.
The 9 Scenic Stops Worth Slowing Down For
Not all Niagara Parks stops deserve equal time. The list follows the natural hiking flow from the staircase descent through the main loop. First-time visitors should focus here instead of trying to photograph every marked feature on the map. That gets exhausting fast.
Stop 1. Wintergreen Cliff
Wintergreen Cliff towers over the first section near the bottom of the stairs. This wall of dolostone forms part of the same escarpment layer that creates the lip of Niagara Falls upstream. Seeing it from below changes your sense of scale immediately.
The cliff rises sharply beside the trail and blocks much of the sky. Water drips through cracks even on dry days. The rock face feels cold when the air above the gorge is warm.
This is the point where the hike finally feels real.
Stop 2. Wilson Terrace Passage
Wilson Terrace Passage squeezes hikers through a narrow gap between tall rock faces along the Cliffside section. It is not dangerous, but the walls close in enough that tall people usually duck instinctively.
Large backpacks become annoying here, and so do trekking poles. People uncomfortable in tight spaces should know that before arriving. While this may sound dramatic, it is not. The passage lasts less than a minute.
Still, it changes the rhythm of the trail. You stop thinking about views and start paying attention to the rock around you.
Stop 3. Fossilized Reef
The fossilized reef section contains visible marine fossils embedded directly into the rock wall beside the trail. Some impressions date back roughly 450 million years, with trilobite markings appearing in sections if the light hits correctly.
Kids usually spot them first, while adults tend to walk past without noticing. Then somebody points at the wall, and the whole group stops moving.
The fossils are easy to photograph, but should never be touched or scraped. The reserve protects them for a reason. A phone flashlight helps during cloudy weather.
Stop 4. Balancing Rock
Balancing Rock sits near one of the busiest photo sections along the loop. A huge upper boulder rests on a much narrower base created through uneven erosion over thousands of years.
From certain angles, the rock appears ready to fall. It won’t, but the illusion works surprisingly well in person. Morning light hits this stop best. By noon, the shadows flatten the shape, and the effect weakens.
Stop 5. Tulip Tree Stand
This is the tree stop worth making. The Tulip Tree Stand shows why Niagara Glen’s Carolinian forest matters. Tulip trees are the tallest native hardwood species in Ontario, and they do not grow widely across Canada.
Their trunks rise straight and high above the trail. The bark looks almost smooth compared with nearby maples. During late spring, the leaves create a lighter green canopy than most Ontario forests. It feels different and quiet here.
Stop 6. Devil’s Arch
The rest of the Cliffside Trail feels rugged and heavy, but this section changes things.
Devil’s Arch forms where a slab of dolostone cracked and shifted, leaving a natural stone opening along the trail route. It is not enormous, but up close, the shape feels stranger than photos suggest.
The detour adds about ten minutes total. Many visitors skip it because they assume the side path leads nowhere important.
Devil’s Arch is the clearest geological feature on the Cliffside section besides the gorge walls themselves. The rock overhead stays damp most days, so watch your footing there.
Stop 7. Rocks in the River and River Trail Views
Down along the River Trail, the Niagara River feels wider, louder, and far more powerful than it appears above. You can finally see how the current twists around submerged rocks and forms swirling channels beside the shoreline.
The American side of the gorge sits surprisingly close to here. Birds drift low across the water, and the current changes shape every few seconds. Nothing feels still.
The rocks near the water remain slick even after dry weather because moisture collects against the gorge walls overnight. Go for waterproof trail runners to help here, as cheap sneakers become miserable fast.
Stop 8. Cripps Eddy
The river goes quiet here. Cripps Eddy sits inside a calm inlet away from the fast main channel. The water turns glassy and still beneath the cliff’s shadow while the rest of the river rushes nearby.
Bird sounds replace river noise for a few minutes. Reflections of the cliff walls ripple gently across the surface. During early mornings, mist sometimes hangs low above the inlet before sunlight reaches the gorge floor.
People stay longer here than planned, not because there is a huge attraction. Because the silence feels rare near Niagara Falls tourism zones. Late afternoon works best for photos as the light softens against the rock wall then.
Stop 9. Mammoth Pothole
The Mammoth Pothole looks exactly like its name suggests. It is a giant circular depression carved into the rock by glacial meltwater, spinning stones against the surface over thousands of years.
The pothole sits near the Cliffside section, close to the return route. The shape becomes clearer when viewed from the uphill side rather than directly beside it. Rainwater often collects inside after storms.
It is a strange final reminder that water shaped everything here, and not just the falls themselves.
Niagara Glen Bouldering. What to Know Before You Go
A free bouldering permit is required and available at the Niagara Glen Nature Centre or at the Butterfly Conservatory before descending the stairs.
Do not ignore that rule, as the rangers are always around to check.
Niagara Glen is one of the best outdoor bouldering spots in Ontario. Climbers use giant detached gorge rocks instead of artificial walls. Routes range from beginner-friendly problems to extremely technical climbs.
The bouldering zones sit separate from the main hiking loops. First-time visitors often discover them halfway through the trail without permits already arranged. That means climbing back out to the Nature Centre first. Frustrating day.

People who want a guided outdoor trip instead of planning everything alone can also book eco-focused hiking and adventure tours through Toronto Eco Adventures. The company runs more than seven guided Ontario experiences, including waterfall hikes and nature day trips from Toronto. That works well for visitors unfamiliar with Niagara Gorge terrain.
Wear approach shoes if climbing is the goal. Gorge rocks stay damp longer than expected.
Planning Your Visit. Getting There, Parking, and Timing
Metered parking at Niagara Glen Trail costs about $1.25 per hour with a daily maximum of about $10. Verify current rates at Niagara Parks before visiting. The parking system uses pay-by-plate machines, and you don’t need a dashboard ticket.
Weekday mornings before 10 a.m. feel completely different from summer weekends. The single staircase entrance becomes crowded fast once tour buses arrive. Early starts mean quieter trails, cooler temperatures, and better light near the river.
Winter hiking stays open, but conditions change sharply. The Nature Centre closes seasonally during colder months. Bouldering permits are not issued in winter.
Something you should always remember is to check trail conditions before leaving Toronto. Spring storms change things quickly.
Why Niagara Glen Trail Deserves More Than a Quick Stop
Two hours here changes how Niagara Falls feels.
Above the gorge, everything moves fast. Crowds shuffle between souvenir shops, lookout rails, and busy sidewalks. Down at Niagara Glen Trail, the pace drops immediately. The air cools, the river sounds louder, and the rock walls start doing all the talking. That contrast is the whole point.
Visitors who want a more structured outdoor day can also pair the hike with guided Ontario eco tours through Toronto Eco Adventures. Their guided hiking and nature experiences work well for travellers who prefer local knowledge instead of figuring out routes and logistics alone.
Most people stand at the top railing near Niagara Falls and think they have seen the gorge. They have not because the real version waits at the bottom of those stairs.
FAQs
Q1: Is Niagara Glen Trail good for beginners?
Yes. The trail is moderate overall. Beginners handle it well with proper shoes and a steady pace. The staircase climb back up feels harder than the trail itself.
Q2: How long does the Niagara Glen hike take?
Most people finish the main loop in about two hours. Add extra time for photos, the Nature Centre, or river stops like Cripps Eddy.
Q3: Is Niagara Glen Trail free?
Yes. Entry is free, but parking costs extra.
Q4: Can kids hike the Niagara Glen Trail?
Yes, though younger children need supervision near the river and cliffside sections. The rocks can be slippery after rain.
Q5: When is the best time to visit Niagara Glen?
Early weekday mornings during spring and fall feel best for most hikers. Summer weekends become crowded quickly.